
1) I searched for the door for quite awhile looking on Craigslist and also at Antique and thrift stores. You are actually most likely to get a good deal at an Antique store. I created the headboard for my bedroom out of an old door which I found at an antique shop - Goose Creek Emporium. It was being used to display other items on. I found the door for this project at Vera's Antiques. It is a little green house on N. Main between James and Sterling in Baytown. You usually have to ask about doors because they are generally in a back room somewhere because too many old doors are too hard to display. So, we went to a back room and looked through the doors. You should knock on them to see if they are solid wood. If it is not then it won't withstand everything you need to do to restore it and it also cannot be cut if it is not solid wood.
The door was purchased for $20. Also, keep in mind to ask them for the price you want. They are very likely to give it to you.
2) Next, all of the hardware needed to be removed. All you need is a drill with a Phillips screwdriver. Put it on reverse, remove all the screws.
3) Because this door had so many layers of paint, sanding alone was not going to do the job of removing the paint. Albeit we did not even know that there were that many layers when we started! We were going to need some paint stripper. You can buy paint stripper that has less fumes and works slowly or paint stripper that is is more audacious. Wear gloves, goggles, and a mask. Seriously. Make sure to sand before you use the paint stripper because this loosens up the paint and allows the paste to work into it. Kind of like srubbing your face and then putting lotion in. The paint stripper we bought was very strong. You apply it thickly and let it sit for no more than 15 minutes (however, always carefully read instructions, time can vary). Because we were outside the time needed to be less than 15 minutes because wind and sun could dry the paint stripper and when it dries it does not scrape off as well. Only apply it to small areas for the same reason. You can use a paint scraper
 to remove the paint. Don't be discouraged if the paint does not come off the first time. I had to apply the paint stripper 4 times and then an orbital sander was required to get off the last thin layer of paint. When removing with sandpaper use a 60 grit or so.
4) Next the surface needed to be smoothed out. This was done with an orbital sander as well. To smooth go over the surface with grits that are increasingly higher in number. Use 100 then 120, then maybe a 150 or 200 to finish it off. Do not press the orbital sander into the surface let it do its own work.
5) Next, I put wood putty in the holes that hardware had left. Fill it and let it overflow the hole a little bit and then run the scraper across in one direction to take off excess. It is okay if it is some of the putty is not even with the surface. Later on you can sand it down to level it to the surface. That is what I did.
6) I wiped the door down with a damp rag so that there would be not dust that could clump the paint up. Then I drew and outline of the tree with a pencil and used it as a guide to paint the tree.
7) Inspiration (this happened after the door was found but I didn't know if I should list it in that order :) : We wanted something to symbolize growth which a tree does and so I had that as a starting point for my inspiration. I had also recently been to an exhibit at the Menil in Houston that displayed some of Cy Twombly's work and it inspired me as well. For me to get a vision of what I want I have to stare at the surface I will be working on and then walk away. I have to be careful to not force myself to come up with something or else the pressure will never allow something to come to me. I thought about trees and scripture and things I thought were beautiful and then I just tried to think of nothing. Then a picture appeared in my mind. It sounds so weird when I write it down but that is how it goes for me. Each person is different but I think it is important to ask all sorts of questions, brainstorm and then just release it all. I think that is when inspiration comes. Anyway, I painted what I thought on a wood scrap I found in my garage and then took away here and there and played with color.


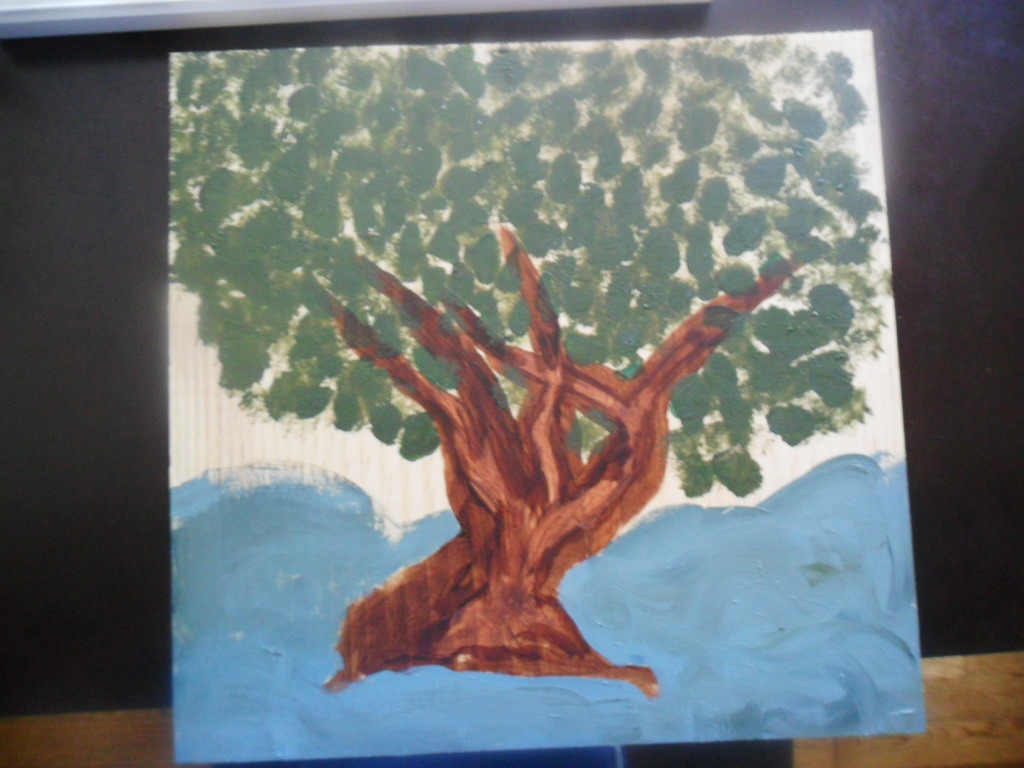

8) Transferring that idea to the door was difficult because I had not considered that the door was much higher. It was a rectangle and not a square. I had to stare at the door again to figure out how I was going to modify my idea. I had to walk away again. I actually took the door home for this part of the process because I needed to have it day and night so I could add some here and there. Unfortunately I cannot tell you what colors I used because I mixed so many different colors up that I don't know. It was different ratios and mixtures of brown, yellow, blue, and white because it was blues, browns, and greens.
I tried to use the same colors in each section of the painting but different strokes and different layering. The bottom is water and so smooth wavy strokes were used. The leaves are semi-stiff brush dipped in paint and smashed onto the surface. The sky was a circular stroke. Covering an entire door in color was intimidating but I was so satisfied with the end result. I also had to clean up the plastic and paints when I felt it was right so that I would not be tempted to continually add (and therefore take away!). Thanks so much for going through this process with me.
May the peace of God rule in your hearts and be thankful.
 |
| Finished Door |
No comments:
Post a Comment